We all know custom domain name helps in better blog branding. More over when ever you migrate BlogSpot to WordPress, you preserve your brand name and your domain name stays the same. So even if you are blogging on BlogSpot blog, the first step which you need to do is grab custom domain name for your blog.
In simple word, when you start with a free BlogSpot blog, you get a domain name like: domain.blogspot.com
When you set up custom domain on BlogSpot, your blog URL will be like domain.com.
Now in this tutorial, I will be helping you with how to set up custom domain name with domains bought from Godaddy. Godaddy is one of the biggest domain company and it’s trustworthy company to buy domains.
Grab domain from Godaddy
Step by step guide:
Login to your Godaddy account and click on domain name for which you wish to set up custom domain with your BlogSpot blog.
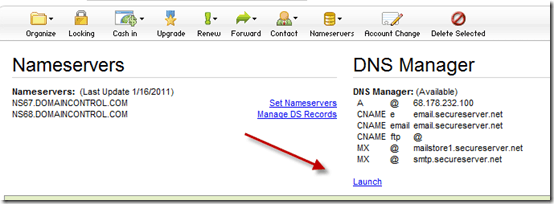
 Now you will be on advanced domain set up page. Click on launch under DNS manager tab (Refer to screenshot).
Adding A record Godaddy:
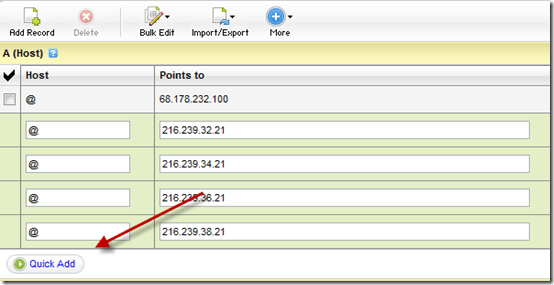
Now to start with we will add A record. Click 4 times on Quick add and following records:
- @ 216.239.32.21
- @ 216.239.34.21
- @ 216.239.36.21
- @ 216.239.38.21
See the screenshot for reference:

Once done, click on save Zone file on top left. Within seconds you will get confirmation message that your zone file has been updated.
Before we move ahead, delete the default A record. In this case, it’s the one with the value: 68.178.232.100
Adding CNAME record:
So far we have done adding A record and now we have to add CNAME record. In CNAME record, find www under Host entry and by default it’s entry will be @.
Something like this screenshot:

Click on pencil icon and replace @ with ghs.google.com
Here is how updated record will look like:
Click on save zone again. Now all you need to do is, wait for a while to see that changes replicate.
You can verify by pinging the domain name using CMD utility of Windows. Open Command prompt and type:
Ping domain.com (replace domain with your actual domain name which you just edited).
Adding Custom domain from BlogSpot panel:
So far we have successfully added the A record and CNAME record to set up domain to point to Google server. Now all we need to do is, login to BlogSpot.com and add this domain as custom domain. Here is another step by step guide for the same:
- Login to BlogSpot.com
- Click on setting infront of domain for which you planning to set up custom domain
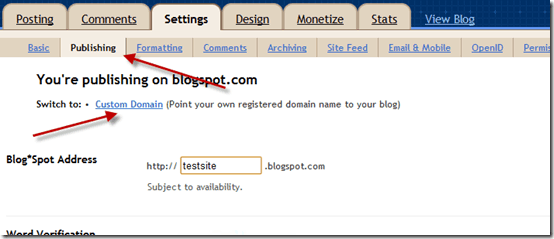
- Go to settings>publishing
On the next page, click on Already own a domain “Switch to advanced setting”
Now on the next page just add your domain name in this format: www.domain.com (Domain= your actual domain name which you bought from Godaddy).
 Fill the image captcha and click on save settings. Viola! Now your Blogspot address will be automatically redirected to your custom domain.
Hope you will take advantage of custom domain option of BlogSpot and get yourself a branded domain.


